When I start MetaStock™ it comes up with the error message “The online vendor account is not configured properly or does not support this feature”. How do I fix this?
This problem occurs when you enter your username and password for the data downloader into the Metastock™ program’s configuration for Reuters Datalink. Reuters Datalink is a data service operated by Reuters and has nothing to do with Trading Game data
To remove your username and password from the Metastock™ Datalink configuration, start up MetaStock™ and after it presents the error message, click “Work Offline”. Then click Tools then Options then select the Reuters Datalink tab. Then click on each of the username and passsword boxes and delete them. Then click OK and shut down MetaStock™. This will remove the error message upon startup of MetaStock™.
Help! I can’t find my data in Metastock™. Where in the heck is it?
When you’ve opened Metastock, Click on File then Open.
Before you do anything further, ensure that the Files of Type towards the bottom of the window is set to Smart Charts.
Click on the Look In part of the Open dialog box and select your Drive C: You should see the following as you do this:
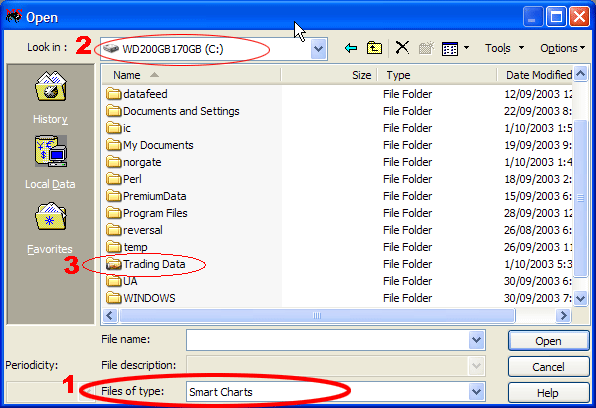
Now double click on the Trading Data folder. You will see:
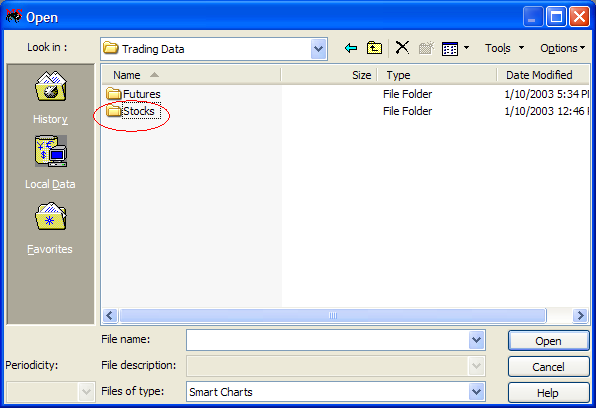
Now double click on the Stocks folder. You will see:
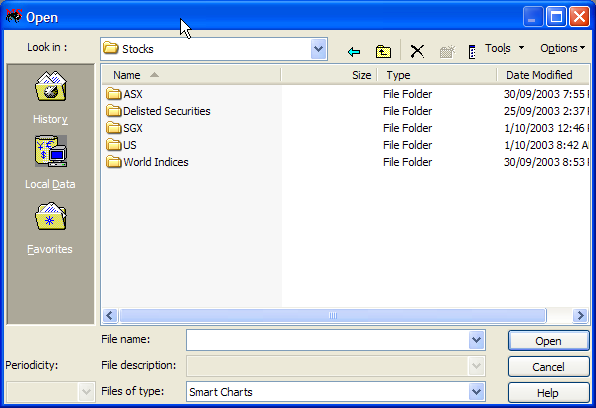
then double click on either ASX, SGX or US (depending upon which exchanges you subscribe to), then double click on Equities (if applicable). You should now see something like:
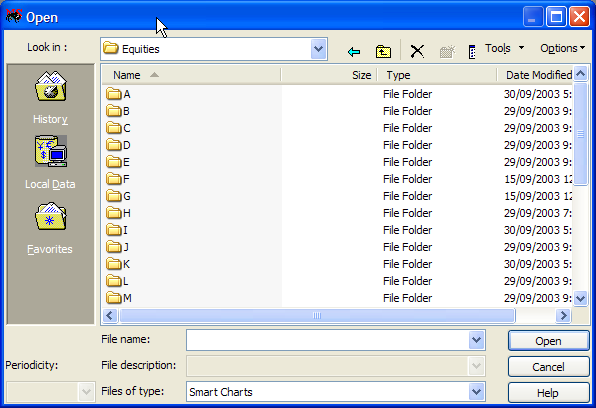
Now, Double click on the A folder and this will show:
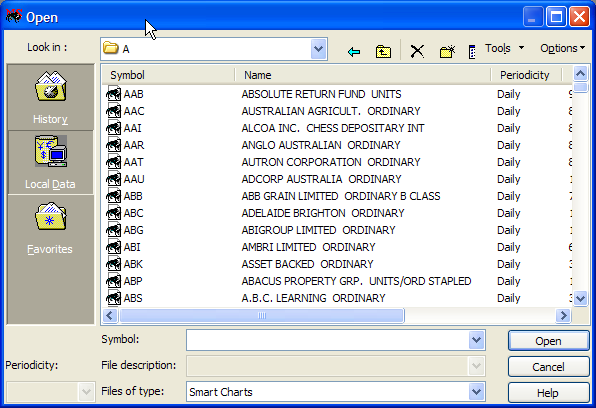
You may now click on the stock you wish to view.
When navigating, you will need to click the Up One Folder ![]() button to go up to the previous level.
button to go up to the previous level.
I am only seeing two years of data.
By default, Metastock™ only shows 400 periods of data (around 1.5-2 years). To view more data in your chart, when you open a chart click on Options then Load Options and change the “Load XXX Periods” to a higher value. 65500 will show all data in your chart.
What time is the data updated?
Click on the relevant link(s) below to see full details:
Australian Market Update Schedule
Where can I find the World Indices?
The default installation path for a Stocks history is c:/Trading Data/Stocks –
c:/Trading Data/Stocks/ASX
c:/Trading Data/Stocks/SGX
c:/Trading Data/Stocks/US
Irrespective of which market history you install, the World Indices folder is located directly under the Stocks folder –
c:/Trading Data/Stocks/World Indices
I don’t want alphabetical sub-folders in my stocks database. Can I get rid of them?
Yes. Click on the “Configuration” tab in Premium Data and then on the “Database Structure” button at bottom right. Untick an exchange to eliminate the alphabetical sub-folder structure for that exchange. Then click “Save”. If you need to revert back, just tick the exchange(s) again.
The ASX and US databases are installed with alphabetical sub-folders by default. This is because many older charting programs (and even some newer ones) can’t handle more than 2,000 files per folder. The MetaStockô program has been able to read up to 6,000 files per folder since version 8.
How do I delete a Custom Folder?
Unwanted Custom Folders can be deleted using Windows in the same way that you would delete any folder. Custom Folders can be found under the relevant exchange folder under the main “Stocks” folder.
Assuming that the ASX history has been installed along the default path, any ASX Custom Folders you have created will be found under – C:/Trading Data/Stocks/ASX/Custom Folders/.
My updates seem to go very slow. What could be the cause?
There are 4 possible causes.
- You are subscribed to ASX/Derivatives, which increases the number of securities that need to be updated each day by a factor of about 10.
There are about 3,000 Equities and Indices in the ASX database and about 27,000 ETOs.
Tip: If you are also subscribed to “intraday snapshots” and only wish to see ETO prices on an end-of-day basis, you can configure the program accordingly. Click the Configuration tab, go to the section called “Update ASX Securities of Type” and untick Intraday for any items that you only want updated after market close.
- You have created a large number of Custom Folders, which need to be updated in addition to your standard database.
Custom Folders are physical folders on your machine rather than “virtual folders” in a charting package. The more you create, the longer it will take to complete an update. To remove unwanted Custom Folders, just delete them in Windows as you would delete any folder.
- You may have “real-time” virus scanning enabled in your Antivirus software.
If real-time virus scanning is active, each small data file gets checked during the distribution phase of an update, which can slow it down enormously. If you would prefer to keep real-time virus scanning enabled in general, one solution is to selectively exclude your Stocks folder from the process. Open your Antivirus program or Security Suite and configure it to either ñ
1. Exclude *.DAT and *.MWD files from real-time scanning, or
2. Exclude the c:/Trading Data/Stocks folder (or whichever folder holds your Stocks database) from real-time scanning.
- Your database files may be quite fragmented.
File system fragmentation and the performance degradation it causes are inevitable consequences of computer usage. Your Stocks database consists of a large number of small files that are being constantly modified, and therefore fragmentation may be a significant issue.
Tip: To make a “fresh start”, you can delete or uninstall your Stocks history, perform a disk defragmentation and then re-install the history by downloading the installer from our site. History installers are always available to current subscribers.
If a slow update “can’t be helped”, consider using the Windows Task Scheduler to perform updates when you are away from your computer.
Can I automate the updates?
Yes. You can create a task in Windows Task Scheduler to run updates automatically at a preferred time. Click on “more information” below for full instructions.
XP
1. Go Start > Control Panel > Scheduled Tasks
2. Click “Add Scheduled Task”
3. Find “Premium Data” in the list and highlight it. [Next]
4. Enter a name for the task and select Weekly. [Next]
5. Select a start time. Then select days Monday to Saturday (typically). [Next]
6. Enter your Windows password (don’t enter your Premium Data password). [Next]
7. Tick the box that says ìOpen advanced properties for this task when I click Finishî. [Next]
8. Click Finish
9. In the ìRunî box, add the following parameters to the end of the existing entry: autoupdate=1 autoclose=1
After you edit the Run entry, it should read something like :
C:/TRADIN~1/bin/DATAUP~1.EXE autoupdate=1 autoclose=1
or (in full)
C:/Trading Applications/bin/DataUpdater.exe autoupdate=1 autoclose=1
Vista
1. Go Start -> All Programs Files -> Accessories -> System Tools -> Task Scheduler
2. Task Scheduler – under “Actions” on the right, click Create Basic Task.
3. Create Basic Task – enter a suitable name (and description). [Next]
4. Task Trigger – select Weekly. [Next]
5. Weekly – select days Monday to Saturday (typically). [Next]
6. Action – select Start a Program. [Next]
7. Start a Program – click Browse. Then navigate to the c:/Trading Applications/bin folder and open it. Find “DataUpdate.exe in the folder, highlight it and click “Open” (or just double-click it). If Premium Data has been installed elsewhere, navigate to the /bin folder on your chosen installation path to find “DataUpdater.exe”. [Next]
8. In the “Add Arguments (optional)” box, enter the following text: autoupdate=1 autoclose=1. [Next]
9. Summary – click “Finish”.
I have lost my data , what do I do?
There are several reasons why you may have lost your data. These may range from a catastrophic failure of your pc to your machine becoming infected with a virus.
Our data allows you the option of regularly backing up the data to a separate location so you should first see if this back up file is intact. If your back up is intact and your data updater is intact you will be able to use the Restore Data function under the Maintenance tab to restore your data.
If you have had a hardware failure such as a hard drive crash then you will need to reinstall both the data updater and the data itself. This is not difficult and only takes a few minutes to be back up and running. Firstly go to this link. Fill in your username and password – note this is not the username and password you use to access the Trading Game website but rather the details that were sent to you when you first subscribed to the data. If you do not know these details simply click on the forgotten username or password box underneath the login details.
After you have filled in your details you will be taken to a download page where you will see details of your subscription. Download the installer for both the data updater and the data history. Save these to your desktop, click on the installer for the updater first. This will allow the updater to automatically unpack and install the new data history you have downloaded.
Once you have installed the data updater and it has absorbed the new database simply run your data update as you normally would and your data will be up to date and you will be back trading.
I’ve bought a new computer and I want to transfer Trading Game Data across to it. Is there anything in particular I need to know?
The Trading Game Data program itself can’t be copied across – it needs to be installed via the program installer available from our Downloads area. On the other hand, existing data histories can be copied across.
Given that your existing history is found under c:/Trading Data/Stocks, copy the entire “Trading Data” folder across to your new machine. After installing Premium Data, you will be taken to the Configuration page. Under General Settings > Data Folder, enter “c:/Trading Data/Stocks”.
The entry for “Data Folder” needs to reflect the path to your “Stocks” folder, or to whichever other folder holds your ASX, SGX or US exchange folder(s).
For instance, if you decided to copy your ASX and US folders to a folder called “MSData” on the D: drive of your new machine, the entry for ìData Folderî should be – “d:/MSData”.
When I click the “Update” button in Premium Data nothing seems to happen.
It could be that you don’t have a Stocks history installed. If you’ve taken out a trial, make sure to download and then run a trial history installer.
If a Stocks history has been installed, it could be that Premium Data has lost track of its location. This could be because –
a) the entire history (or a critical part of it) has been accidentally deleted or dragged away, or
b) The history has been deliberately moved to a new location without Premium Data being informed.
The database location is recorded in Premium Data as the entry for “Data Folder” under the Configuration tab. Upon a default installation, this entry will read – c:/Trading Data/Stocks.
If you have moved your data history to a new location, enter the path to the “Stocks” folder accordingly.
If you think you may have lost a critical part of your database, download and re-install a fresh history.
Please Note – Stocks updates are handled through the “TG Data” program. Keep in mind that there are separate updating programs dedicated to handling Forex (“TG Forex”) and Futures (“DataTools”). So to update your data if you’ve bought multiple packs, you’ll need to click on each icon and this will allow your data to update separately based on the packs you’ve purchased.
I can’t seem to connect to your servers to get an update. What can I try?
Click on the Update tab in Trading Game Data and go to the Server Selection menu. Try updating from Servers 1, 2, 3 and 4 in turn.
We employ multiple servers in case one of them goes down. Normally (when Server Selection is set to “Automatically Cascade”) the program will move to the next server automatically if it can’t get a connection. However, occasionally the cascade fails, or times out. Try increasing the “Time Out” setting under the Configuration tab, or try updating from each individual server in turn.
Still no connection. What’s next?
Make sure that your Personal Firewall is not blocking “DataUpdater.exe” from accessing the internet. See the next answer below.
I think my firewall asked me whether I should allow “DataUpdater.exe” to access the internet and I answered “no”. What can I do now?
Some Personal Firewall applications prompt you to re-confirm permission for internet access whenever they notice that a program has changed (for instance, because of a component upgrade).
“DataUpdater.exe” is the engine behind Trading Game Data and needs to be able to access the internet. If you have inadvertently blocked it, you’ll need to take steps to un-block it.
“Security Centres” or “Security Suites” or “Personal Firewalls” can generally be accessed from the Windows System Tray at the bottom right of the Windows screen.
Open your Personal Firewall and look for a tab called “Programs” or “Program Control” or “View Applications” (or something similar). The idea is to find where the Firewall keeps the list of programs that it knows about. Find “DataUpdater.exe” in the list and then click “Permit” (or “Allow Full Access” etc).
I have checked my firewall settings (or I have no firewall installed), but I still can’t seem to connect.
Check your internet connection settings under the Configuration tab.
The default connection option for Premium Data is to use your settings from Internet Explorer. This option is o.k. even if you use Firefox or another browser to access the internet, as long as Internet Explorer is actually installed on your machine. If Internet Explorer is not installed, select Direct Connection. If Internet Explorer is installed, make sure that its not currently set to “Work Offline”. Start Internet Explorer and click the File menu. If “Work Offline” is ticked, click on it to untick it.
If you are using a proxy server on a LAN, please configure the proxy settings within Internet Explorer (Tools -> Internet Options -> Connections -> LAN Settings). Otherwise, try the Direct Connection option.
Click here to choose the correct data package for your needs.